Glosary
Will be added
Infill
What is infill?
In FDM 3D printing, it is preferred not to print objects as completely solid structures to avoid over consumption of the filament, as well as the increased printing time. 'Infill' is a term used to describe what fills sealed cavities within a 3D model, whether that being solid plastic or an infill pattern.
Why is infill needed?
Infill is needed to allow FDM structures to print, it acts as support, if the internal cavity of a model was left empty, upper surfaces would collapse due to overhang (See Support process guide). Infill also provides strength and weight to an otherwise empty shell. By adjusting the infill density, it is possible to obtain the desired strength, weight and print time.
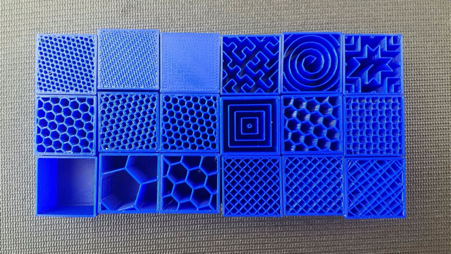
Types of infill patterns
There are many infill types that offer different advantages. A few of the types are listed below.
Rectangular

Offers reasonable strength in all directions and a fast print time. For most slicers it is the standard type of infill.
Triangular

Triangular infill type is used when strength is needed in the direction perpendicular to the faces.
Concentric

Concentric infill type is used when the print is intended to be flexible.
Honeycomb

Honeycomb infill type offers the highest strength, with a fast print time and filament usage.
Different infill settings
The density of the infill, often called infill percentage, directly affects the weight, strength and material usage. 0% infill percentage means no fill, whereas 100% infill means solid fill. The higher the infill percentage, the more solid and heavier prints will be and vice versa.

0%
Hollow parts that only have walls can be printed with 0% infill density, but the bridges and walls must be strategically planned to avoid print failures.
20%
The majority of the slicer programs use this percentage interval as the default value, since it offers reasonable mechanical strength as well as low filament usage and print time. For most of the prints, this default value is appropriate and we ask that you do not use higher than this percentage in the uCreate studio without good reason in order to save filament
50-80%
Used for prints such that require high mechanical strength (brackets, beams etc.). The print time is higher compared to default infill percentage, as well as strength.
100%
100% infill is only used in very niche situations. This is because when printing at 100% infill, the entire model is printed as though it was a shell, including the internal cavities. This has a number of downsides including possible warping (See Common problems in 3D Printing), weight and material waste. The only real reason to print at 100% is if you are trying to print something that will be waterproof and have already found that lower infill settings do not work. Please note that even at 100% infill, PLA prints will still not act as pressurised vessels.
Infil settings in different slicing softwares
CURA (link to top level guide)
In Cura, basic infill settings can be changed like this:

ideaMaker (link to top level guide)
In ideaMaker, basic infill settings can be changed like this:
'Animated Gif Here'
PruaSlicer (link to top level guide)
See also
You may also wish to review:
3D Printing Directory
FDM Directory
SLA Infill Process Guide