

Introduction to silicone moulds.
In order to use the low temperature casting system, you must first make a mould to cast into. Moulds are made from high-temperature silicone. The silicone comes in two parts, the silicone (part A) and the hardener (part B). Once mixed the silicone will harden or ‘cure’ to a temperature resistant mould that is suitable for putting into the low temperature caster.
To create a silicone mould, we pour the liquid silicone mix over our form in a mould box and allow it to cure, giving us a ‘negative’ of that object. We can then fill this void with pewter.
If your initial object is made of glass ask us for mould release as this is required.

Health and Safety.
Use the black tray provided to avoid spillages. If a large spillage does occur, immediately inform a member of staff. Note that unmixed silicone, will not cure. Any residue must be wiped up and binned. If you spill mixed rubber, it will cure and can be cleaned up more easily.
Wear gloves provided. Be aware of allergies to gloves, latex etc. If any silicone residue gets on your skin, wash it off immediately. The silicone rubber is non-toxic but avoid contact with skin as it is hard to clean.
The silicone is not food-safe! Only use for low-temperature casting.

Pouring Sprues.
A pouring sprue is a channel that allows molten metal to flow into the mould cavity. Depending on the form you are casting, it may already have one or one may need to be cut. You can build a pouring sprue into the form you are casting. Having the pouring vent built into the mould can make the casting process easier.
If your form does not have an existing pouring sprue, they can be made with clay. The vents can also be cut into the mould once cured, with a sharp knife, but this will not give as clean a finish.
Detail may be lost at the locations of your pouring sprues, so take this into account when adding them.

Air Vents.
Vents in casting allow for the removal of any air that is trapped within the mould. This air would cause your final product to have air bubbles, effecting the surface quality. The shape of your form will determine where air vents are needed. It may become more obvious where air vents are needed once you have done a cast. You can use a knife to cut in air vents after your mould has been created.
Detail may be lost at the locations of your air vents, so take this into account when adding them.
Generally, this is formed by U shapes in a mould.
-
Make sure all air vents exit the mould above the pouring spout or the pewter will leak out!
-
These can be added in the mould-making process with wire or cocktail sticks.

Types of moulds.
Silicone moulds can be made in one or multiple parts.
For a single part mould:
- Create a mould box to contain the liquid silicone until it hardens. Users can either 3D print a mould box, create a mould box using cardboard and hot glue or use Lego. Remember that your mould box must fit within the tray of the caster, 32 x 75 x 150mm.
- Attach the form you are casting and mould box to a flat surface using double sided tape or hot glue. Leave at least 5mm between the form and the walls of the mould box.
- Make sure the seams of the mould box are watertight. Reinforce with hot glue if needed.
- Ask a member of uCreate staff to apply mould release.
- You are ready to mix your silicone and pour! See the mixing and pouring process below.
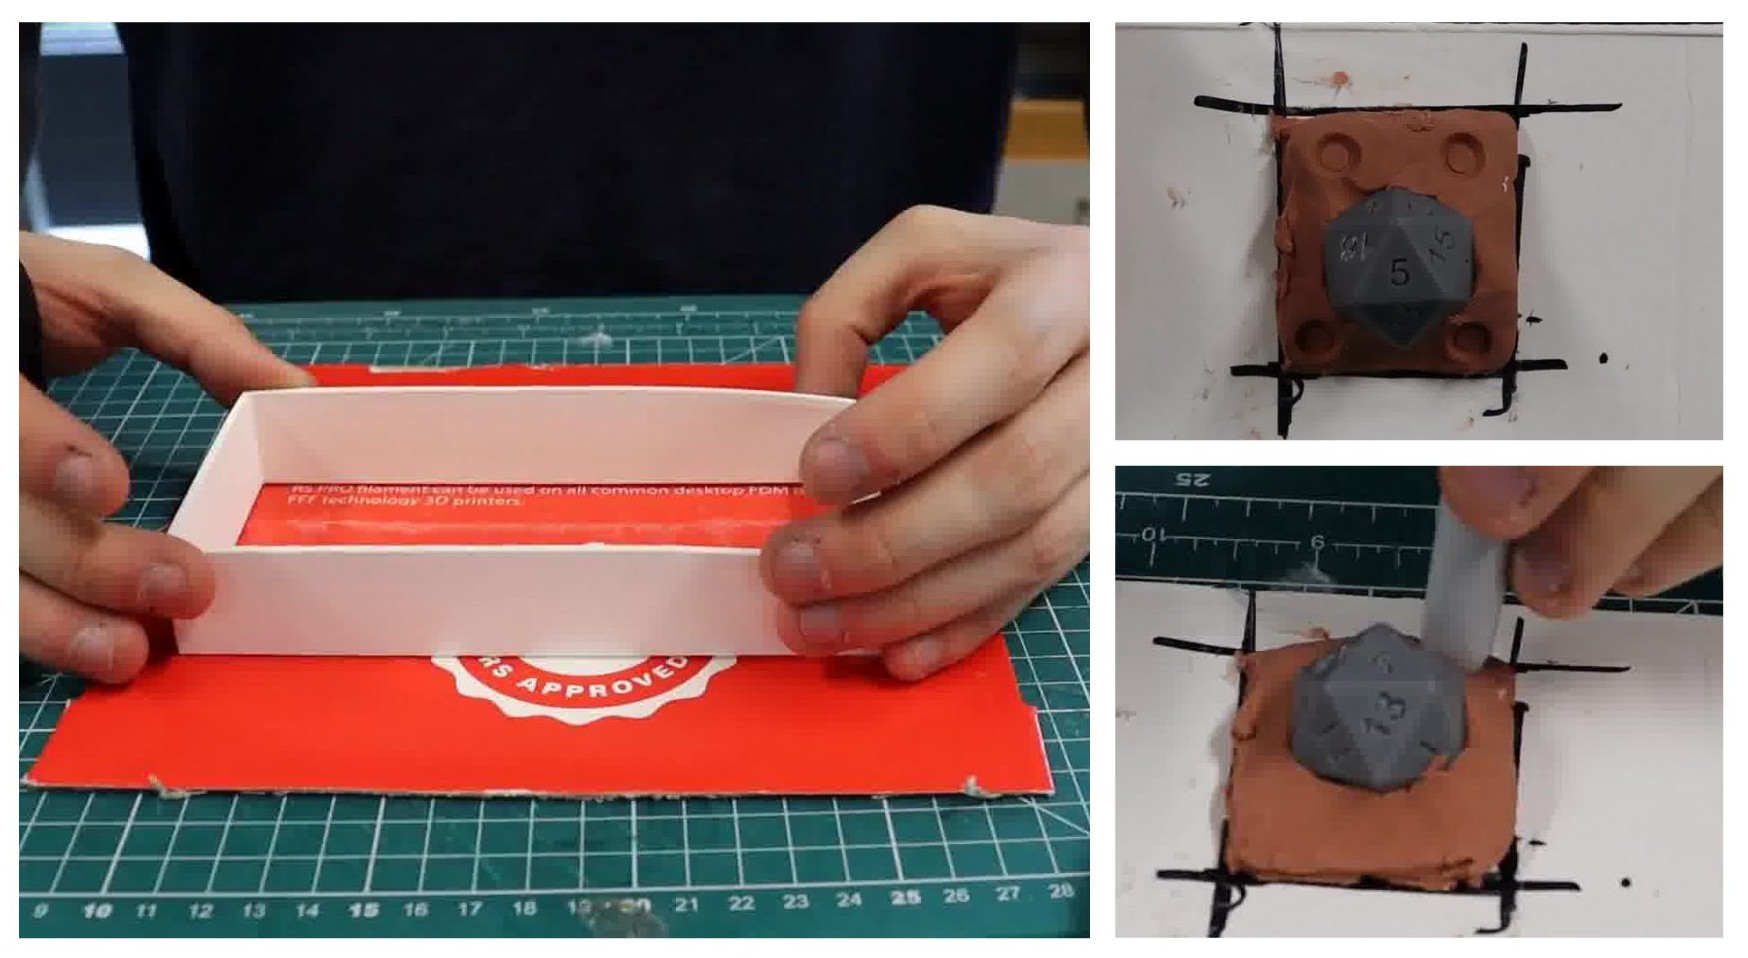
For a two part mould:
- Create a mould box to contain the liquid silicone until it hardens. Users can either 3D print a mould box, create a mould box using cardboard and hot glue or use Lego. Remember that your mould box must fit within the tray of the caster, 32 x 75 x 150mm.
- Split the object into two separate pours by surrounding the object in clay. Make sure the clays surface is smooth and fits snug against the form and the mould box.
- Add registration marks by making dents in the clay with the back of a pen or something similar.
- You are ready to mix your silicone and pour! See the mixing and pouring process below.
- Once the first layer has cured, flip over the object and remove the clay. DO NOT MOVE THE FORM WITHIN THE SILICONE!
- Ask a member of uCreate staff to apply mould release so both sides of the mould do not fuse.
- You are ready to mix your silicone and pour again! See the mixing and pouring process below.
The mixing and pouring process.
When mixing silicone parts A and B, begin by ensuring you have all the necessary equipment: Parts A and B, a tray, gloves, blue roll, mixing sticks and a mixing cup. Wear gloves to protect your skin from the uncured silicone.
Measure out Parts A and B in a 1:1 ratio by weight and pour both parts into the provided mixing cups. Mix thoroughly, scraping the sides and bottom of the tray to ensure complete integration, using a folding motion to avoid introducing bubbles; do not whisk. Clean any unmixed residue from the mixing area with blue roll, as it will not cure. Allow the mixed silicone to cure on the mixing sticks and in the pot; once cured, it will peel off easily.
When pouring the silicone, pour it in a slow, thin stream to minimize bubbles, ensuring the silicone layer is at least 5mm above the highest point of the form. For areas prone to bubbles, you can paint a thin layer of silicone onto the form before pouring the bulk of the silicone. Pour moving back and forth to cover the form evenly, and avoid pouring all the silicone into one corner. Tap the mould on the table gently after pouring to help bubbles rise to the surface. Be mindful of the silicone's pour life, which is the time window in which you can mix and pour it before it begins to set.
Allow the silicone to cure for at least 3 hours or until the next day. Once cured, remove the mould box and peel the silicone off the form if possible. If the form is stuck, use a knife to cut the mould, making zigzag cuts to create registration marks, which will help the mould fit together accurately.
The following video shows multiple silicone mould making techniques and pours.