
Drawing paths.
There are multiple tools available for drawing paths. Every path consists of nodes (points) that are connected to each other, like pearls on a string. The ends of this string can be connected like in a chain (closed path), or there can be two end nodes, that are only connected to one other node (open path).
In Inkscape, you can draw paths using the pen, pencil or calligraphy tools.
To draw a path consisting of straight lines with the pen tool, select the tool and click with the left mouse button to create the first point (node) of the path. Move the mouse and click again, repeating for as many nodes that you want to draw. To finish the path, right-click with the mouse.
To draw a path consisting of curved lines with the pen tool, click with the left mouse button to position the first node. Keep the mouse button pressed and move the mouse slightly. You are currently moving one handle of the node. Left-click and drag to continue the path, or right-click to finish it.
To draw with the pencil tool, press the left mouse button and drag the mouse around the canvas. The Pencil will leave a green trace that follows the location of the mouse cursor. When you let go of the mouse button, the shape you created will get its stroke (and/or its fill, if you have one set). You can edit the smoothness of the stroke.
The calligraphy tool lets you draw in a natural manner and alter things like the width and angle of the stroke as you go. You can enable pressure sensitivity, which is compatible with pen tablets. In the tool controls, you can change the width of the path. This is relative to the canvas and depends on your zoom level. You can create special effects when tracing over an image such as thicker strokes over dark images and thinner strokes over lighter images.
More information on using these tools can be found under the 'Drawing Free Shapes' section of the Inkscape beginners guide.

Editing paths with the node tool.
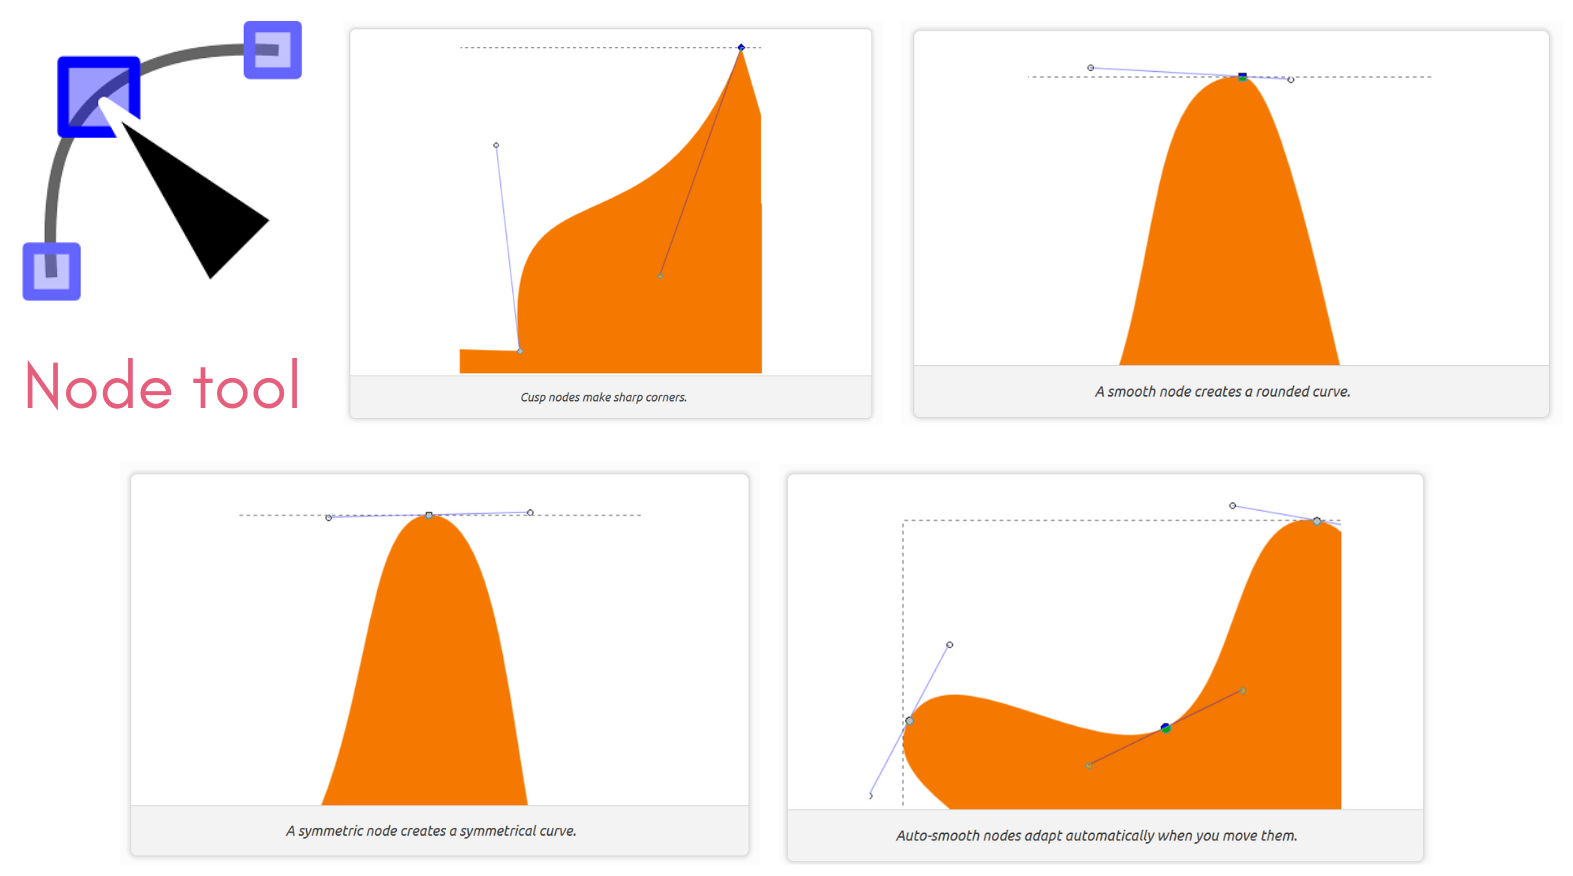
Points on a path are called nodes, marking a curves end points. The node tool can be used to edit paths you have created.
Each node can only be connected to one or two other nodes. It’s impossible to attach a third line to a node. When you need to draw a branching, you must create a separate path for one of the branches.
In Inkscape, a node’s position is marked by a square, circle or diamond handle on the line that represents the path.
A path’s shape can be changed radically by moving the nodes it consists of.
There are four kinds on notes in Inkscape: corner (cusp), smooth, symmetric and auto-smooth. Corner nodes are for sharp corners, smooth nodes make for smooth curves, symmetric nodes are like smooth nodes but produce symmetrical shapes, and auto-smooth handles are adjusted automatically to produce the smoothest curves possible.
There are multiple node tool options available in Inkscape. For example, inserting new nodes, deleting selected nodes and merging nodes. Details of these functions can be seen on the Inkscape beginners guide.
More information on using the node tool can be found under the 'Drawing Free Shapes' section of the Inkscape beginners guide.
For further details about editing paths, see our 'Editing Paths in Inkscape' knowledge base page.
Path commands.
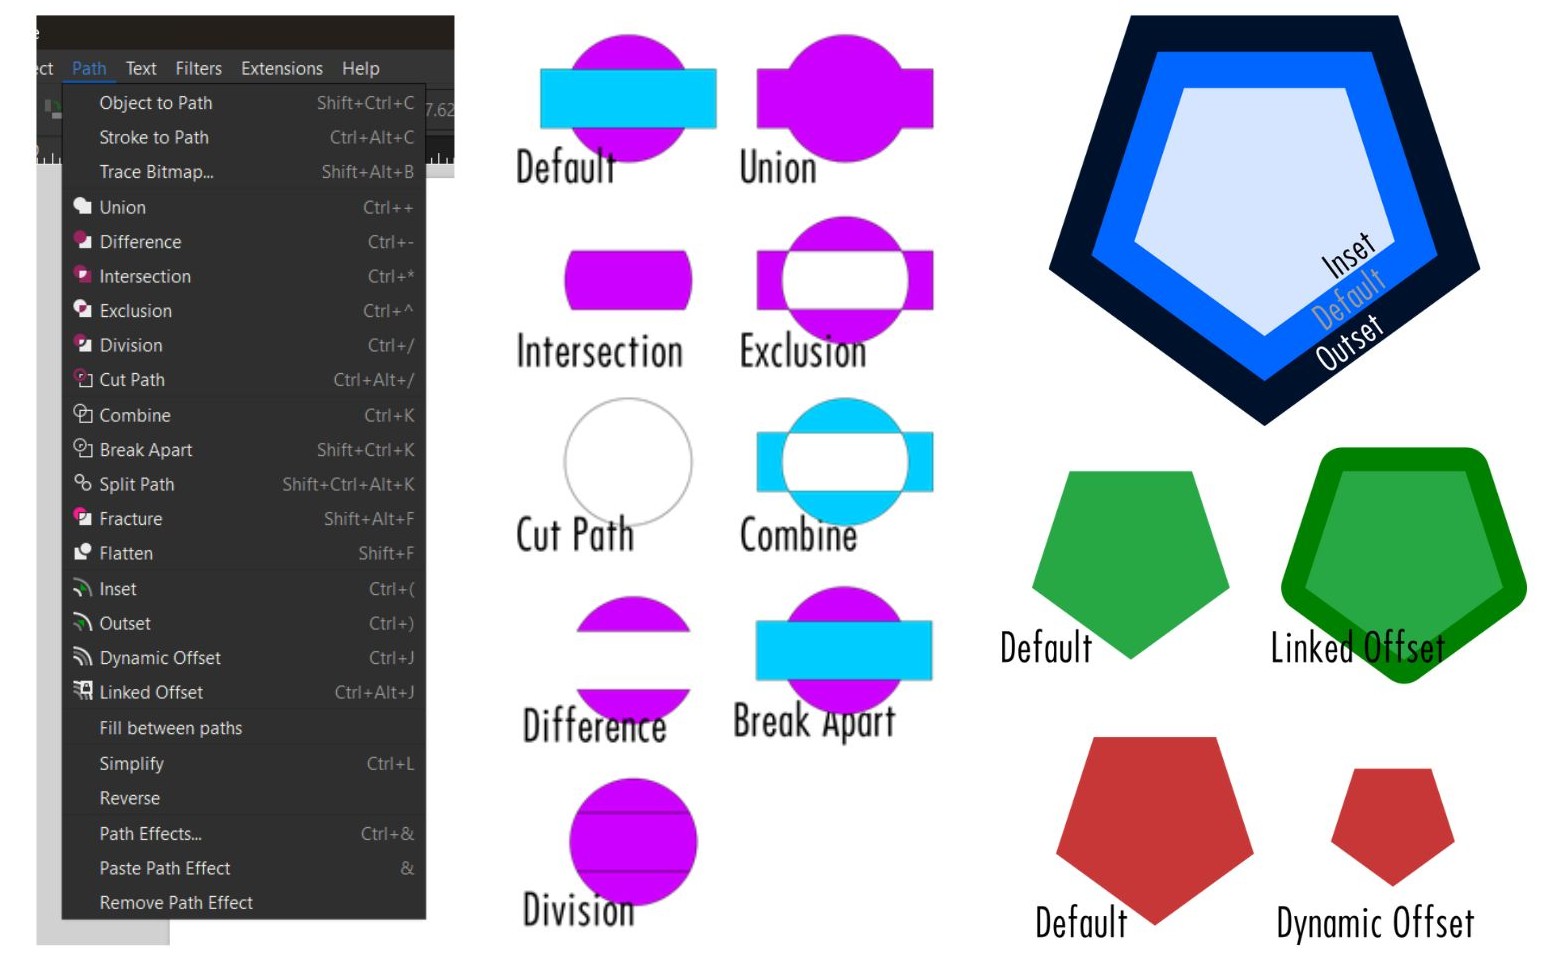
Path commands can be found under ‘Path’ in the Menubar.
‘Union’ unites two objects with the bottom object’s formatting.
‘Difference’ punches the top object through the bottom object.
‘Intersection’ creates a new path of the overlapping are of both objects.
‘Exclusion’ does the opposite of Intersection.
‘Division’ uses the top object as a guide to cut the bottom object into pieces.
‘Cut Path’ is like ‘Division’ but leaves unfilled path segments that are cut apart.
‘Combine’ unites two objects into a compound path with the top object’s formatting. How the fill is applied on the overlapping area can be changed using the fill rules with the ‘Fill and Stroke’ dialog.
‘Break Apart’ makes the original objects independent again but does not change the formatting.
‘Inset’ shrinks the whole path in two points in all directions.
Conversely, ‘Outset’ enlarges it.
‘Dynamic Offset’ creates a single node that can be dragged to inset/offset (and potentially distort) the path.
‘Linked Offset’ creates a new offset path that is linked to the original and placed behind it (you can change this path’s colour to see it). Note that modifying the path will change the offset path proportionally.
Drawing shapes.
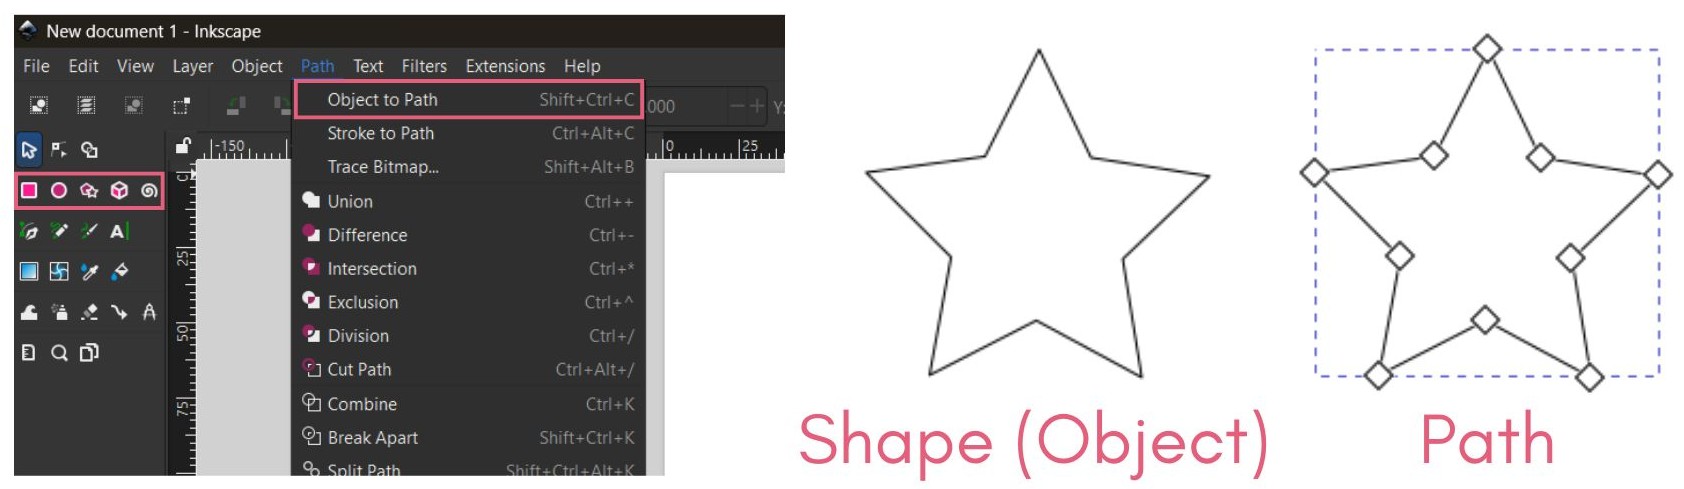
Inkscape has dedicated tools to draw things like rectangles, ellipses, polygons, and stars. These are very different from paths that simply look like these shapes.
You can select the shape and choose Path and Object to Path to convert it to a regular path, which will allow you to freely change its shape. Note that it may look unchanged since the outwards appearance of the object looks the same, but you can switch to the node tool to see independent nodes that define the shape of the path.
It is usually easier to start with a shape, convert it to a path, and reshape than it is to draw something from scratch with the Pen tool.
More information on drawing shapes can be found under the 'First Steps' section of the Inkscape beginners guide.
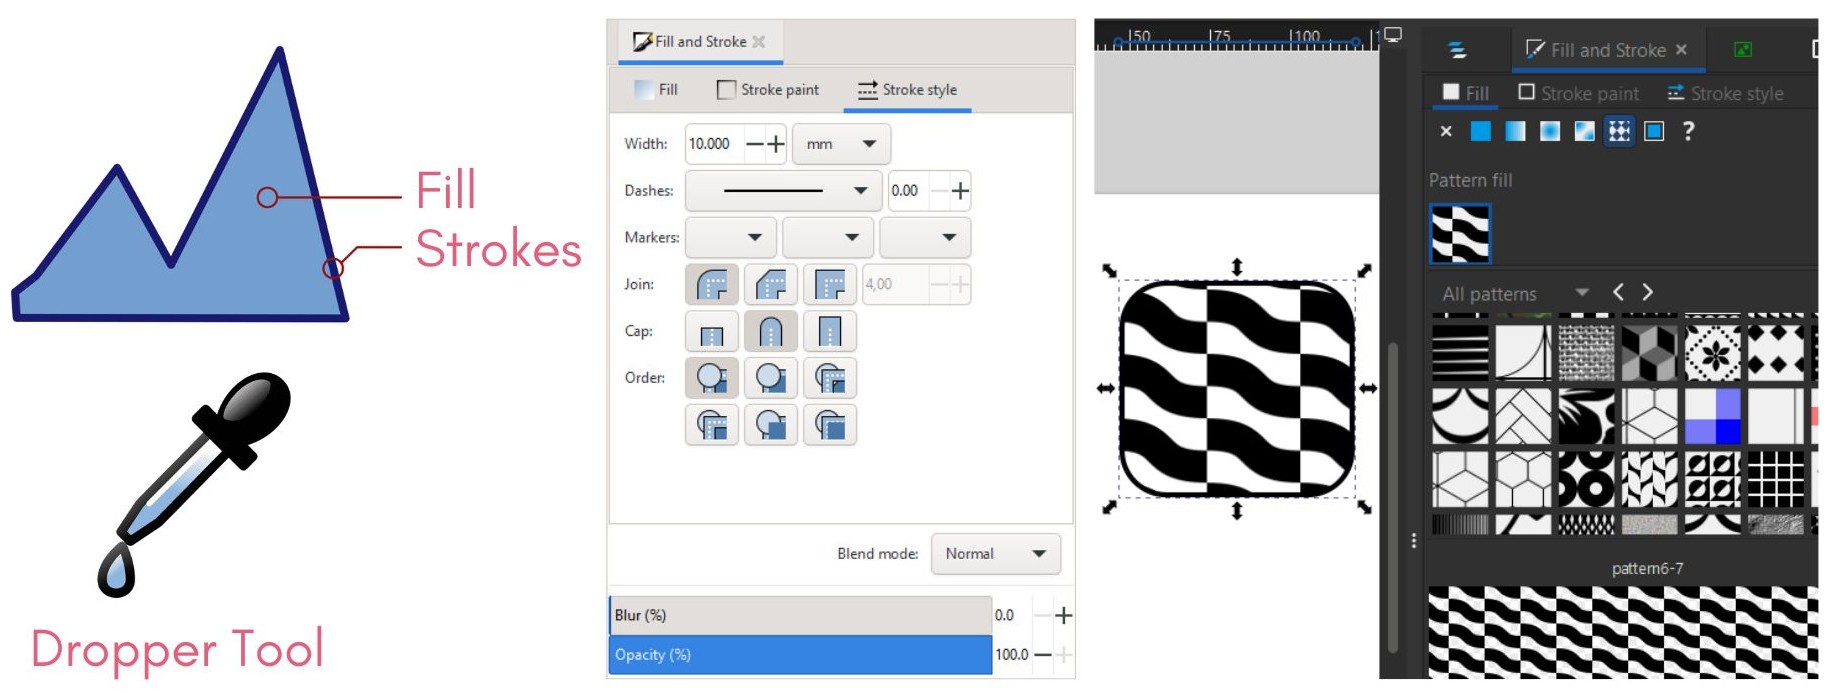
Fills and Strokes.
An objects fill relates to the colour inside an object. An objects stroke is the outline of an object.
When new objects are drawn, it will take on the colour and style of the default fill and stroke shown in the top right corner of the interface. These can be edited using the fill and strokes dialog. Strokes are always centred on the path or object they are applied to.
Swatches can be used to save colours for using multiple times in your project or for changing the colour of multiple objects at once. Swatches can be accessed on the fill and stroke dialog box. Changing the swatch of one object will change the colour of all others who have that swatch applied.
In the fill and strokes dialog box, you are also able to assign patterns to fill shapes. With an Object selected, you can also make your own patterns using Object > Pattern > Object to Pattern which adds the Pattern to Pattern fill.
The style Indicator, on the bottom left shows the current fill and stroke values. When you right click on this, you will see a menu of further options.
The dropper tool copies a colour somewhere in your design.
More information on fills and strokes can be found under the 'Changing How Objects Look' section of the Inkscape beginners guide.
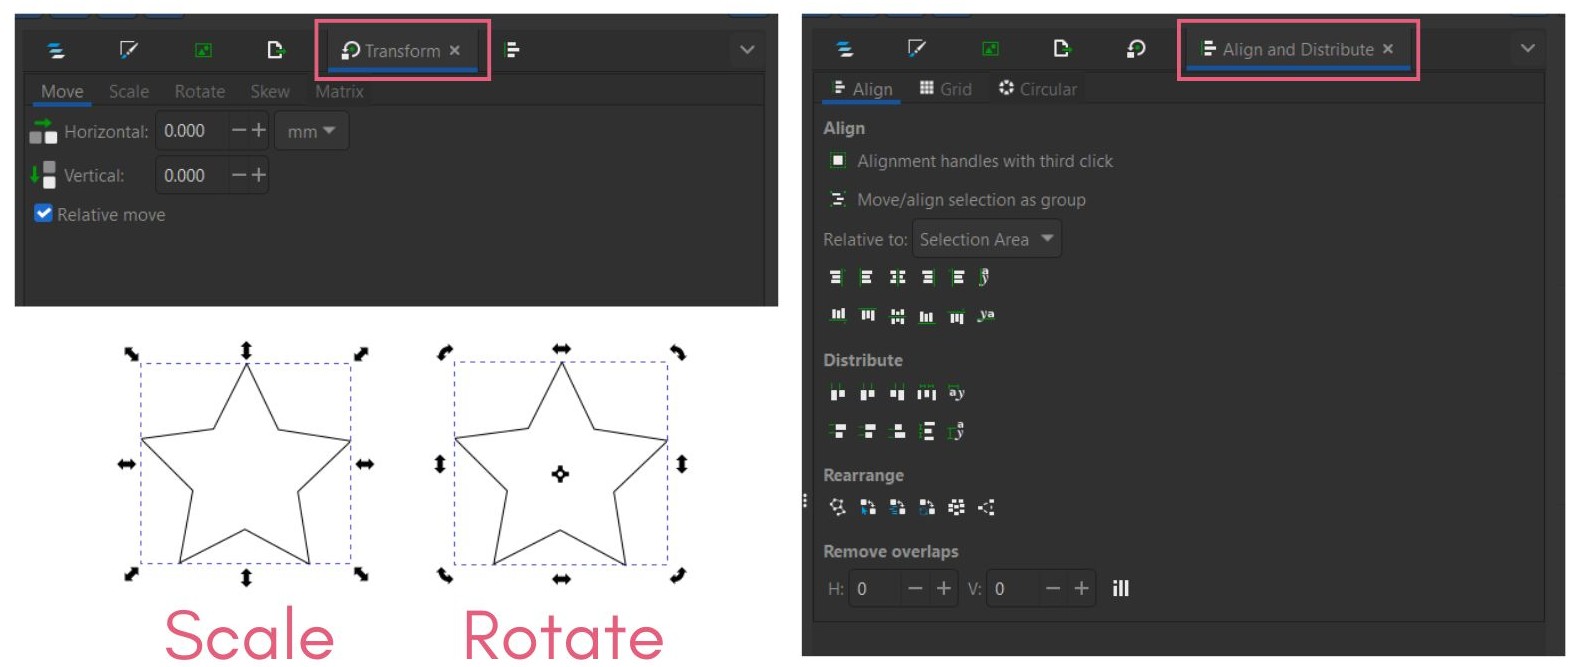
Transforming objects.
Select an object and drag to move it. You can constrain it to a horizontal or vertical path by holding Ctrl. Moreover, you can also use the arrow keys. Note that the distance moved is controlled within Preferences (Ctrl + Shift + P) > Behaviour > Steps. Shift + arrow keys moves the object ten times farther.
There is a transform dialog box, which contains move, scale, rotate, skew and matrix settings.
Resize an object by selecting it and dragging its handle. The status bar will display the scaling percentage value. Hold Control + drag to constrain its original shape. Click the lock icon on the Tools Controls bar to scale proportionally. Shift + drag to scale from the centre of the object. Alt + drag allows scaling at specific percentages by snapping.
Click on an object to select it and click again to change its handles. Dragging the corner handles will rotate the object whilst dragging side handles will skew it. The cross is the Rotation Centre. It can be moved and does not have to be inside the object itself. Shift + clicking on it resets to the default position.
Click Object and go to Align and Distribute to open its dialog and arrange selected objects in your workspace.
Using text.
In Inkscape there are two main forms of text: regular and flow. Select the Text tool, click on the canvas and type to create regular text in a straight line. Click and drag a textbox to create flow text which wraps to new lines automatically.
It can be useful to curve text along a path. Select the object and text and go to Text > Put on Path. Set the path’s stroke and fill to None to hide the path and leave the pathed text.
Converting text to path is useful to make sure its appearance stays the same when someone who does not have its font is viewing it. It is also useful to tweak/distort text in ways not possible with live text. Select the text and hit Path > Object to Path (the Status Bar will indicate this).
